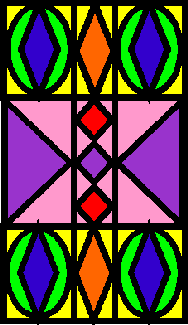
In this plan for a stained-glass window, the yellow and pink areas
are the background colors, and would be laid on as solid sheets of yellow
across the top and bottom and a solid sheet of pink across the center.
The other colors are the smaller patterns cut from templates. The perceived
colors will actually result from blends created by overlaying one color
on top of another (the orange diamond would be actually be made of pink
cellophane laid over the yellow). The black is the painted leading.
|
Start with a piece of somewhat heavy transparent or translucent plastic
that has at least one smooth side and is just slightly larger than
you want the finished window to be (it's going to be screwed in behind
the window opening, so there needs to be a little overlap). Plexiglas
or those plastic ceiling panels that cover fluorescent lights in drop
ceilings will fit the bill. Your colored areas will consist of cellophane
gift wrap and leftover or damaged lighting gels. Cellophane gift wrap
is available in a variety of colors; get several different colors,
and if your window is large, make sure you buy at least one or two
colors in long rolls - these will be used as a background.
Sketch out a plan for the window - the easiest way to make sure that
you have a window with lots of colored areas and only a little black
leading is to use geometric shapes (circles, squares, diamonds, etc.)
in a repeating pattern. You can also go to the library and check out
some books with examples of real stained glass windows if you're looking
for a real challenge. Place the plastic panel on the floor, smooth
side up. Measure and cut large swatches of colored cellophane that
will completely cover the panel and provide a colored background for
your smaller shapes - you can use one color only for the background,
or you can mix and match. Again, the easiest way to do this is to
stick with simple squares and rectangles; lighter colors like yellow
and pink will allow for better contrast. The background colors can
either butt smoothly against each other or overlap, depending on how
you want to create your pattern (keep in mind that if you overlap,
the color will change - experiment a little). Make a fairly watery
mix of white glue and water - the cellophane is lightweight enough
that it won't need a whole lot of glue to adhere it to the panel.
Paint the smooth side of the panel with the glue and water mix, laying
down the background cellophane and smoothing out air bubbles with
a rag as you go. You should now have a panel that is entirely covered
with colored cellophane. While it's drying, make cardboard templates
for the smaller shapes in your pattern; use the templates to draw
and cut out shapes from deeper-hued cellophane and/or leftover gels
(lighter-weight gels work best for this). When the panel is dry, paint
the back of the smaller shapes with the glue and water mixture and
lay them directly on top of the background cellophane. Use a damp
rag to smooth out the air bubbles as you go and to wipe up any glue
that seeps out around the edges. When those have dried, paint in the
leading with black latex paint. Attach your window to the back side
of the window opening with screws, with the cellophane-and-leading
side facing the audience.
Because the cellophane is translucent, you probably won't need to
paint a background scene behind it. And lit from behind, you'll get
a beautiful effect of light streaming in through the colored panes,
especially effective when it's the only light source on a dark stage
as the curtain opens.
|