 Active Topics
  Memberlist
  Calendar
  Search
 |
Active Topics Memberlist Calendar Search |
| |
| Set Design and Construction | |
| |
  |
| Page of 2 Next >> |
| Author | Message |
|
Hill
Walk-On 

Joined: 10/12/06 Online Status: Offline Posts: 0 |
 Topic: basic set constructions Topic: basic set constructionsPosted: 10/12/06 at 5:56am |
|
I am a musician teaching drama for the first time, so please be patient with me.
 What are good guidelines for building set walls and supports? What resources are good for a novice? Email at wjhill@luzacademy.com would be appreciated. Thanks! What are good guidelines for building set walls and supports? What resources are good for a novice? Email at wjhill@luzacademy.com would be appreciated. Thanks! |
|
 IP Logged IP Logged |
|
|
Nanette
Celebrity 

Joined: 8/01/06 Online Status: Offline Posts: 399 |
Posted: 10/12/06 at 8:19am |
|
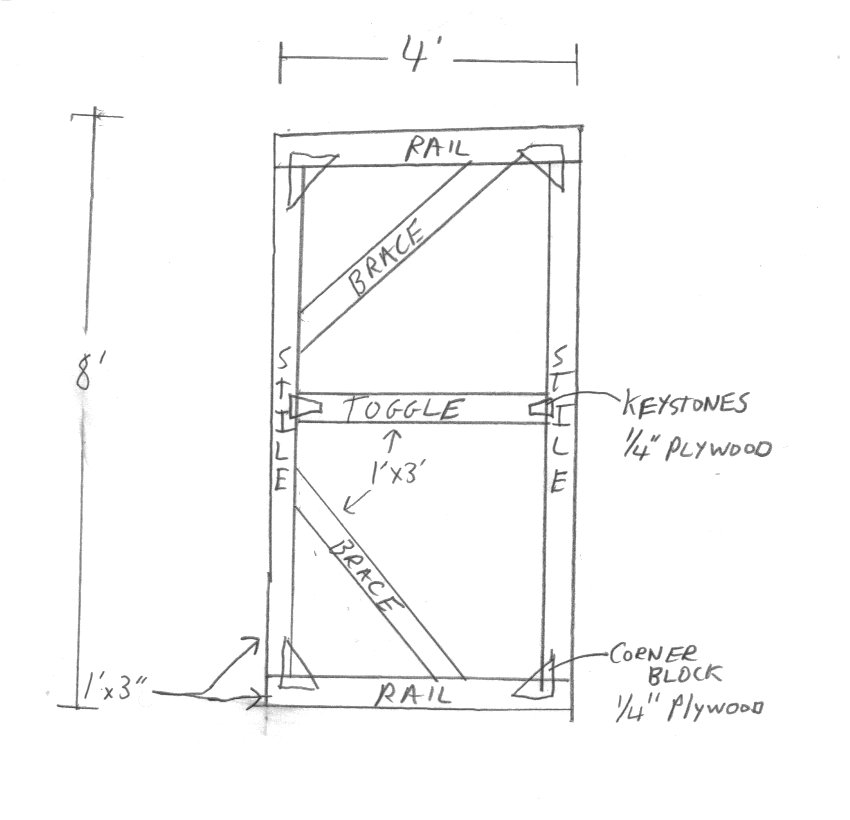
Here's a link to a reference for you. The reference is noted at the top of the link. I've also included a more detailed labled picture of the back of a flat. Hope it helps. :o) http://www.northern.edu/wild/th241/sc92.htm
|
|
|
In a world of margarine, be butter!
|
|
|
IP Logged |
|
|
dboris
Celebrity
Joined: 2/10/04 Online Status: Offline Posts: 124 |
Posted: 10/12/06 at 12:52pm |
|
That's a great description of how to build a flat, but you might want to consider covering the flat in Luan plywood instead of muslin. Muslin is nice because it's light, but the plywood is much more durable. Dan |
|
|
IP Logged |
|
|
Linda S
Celebrity
Joined: 4/16/05 Location: United States Online Status: Offline Posts: 312 |
Posted: 10/12/06 at 1:20pm |
|
I agree with dboris about luann. Also with luann you don't need to use as much reinforcement. Depending on the size a couple of rails usually will do fine for support. Linda |
|
|
IP Logged |
|
|
castMe
Celebrity

Joined: 11/02/05 Online Status: Offline Posts: 206 |
Posted: 10/12/06 at 4:57pm |
|
Hi Hill. When you tack the conerblocks and keystones in place, be sure to keep them back 3/4" from the edge of the toggles, rails and styles. This will allow you to make flat edges flush when you need to make a right angle. If possible, construct flats on a flat wooden floor so you can nail the pieces to the floor before you attach cornerblocks and keystones. You can measure corner to corner to ensure the flat is square.
|
|
|
Investigate. Imagine. Choose.
|
|
|
IP Logged |
|
|
Playwright
Celebrity

Joined: 4/01/06 Location: Canada Online Status: Offline Posts: 126 |
Posted: 10/12/06 at 5:37pm |
|
One of the CT's I work with uses a 'pins & wedges' type of thing to hold the flats together. They came up with that system for when we travel to a theatre festival and have a limited time to put up and take down sets.
|
|
|
IP Logged |
|
|
Gaafa
Celebrity

Joined: 3/21/04 Location: Australia Online Status: Offline Posts: 1181 |
Posted: 10/15/06 at 12:20am |
|
Think about what sizes of flats you need to produce & the logistics of being able to handle the modular pieces.
Any thing over 5? wide can become a drama. Initially to build up a full stock of flats, will happen over time, as the need arises. However stick to a regime of standard sizes from 1? through to 6? widths. Work out the height you need to suit your venue, 12? is a normal height for most comeatres. However you may need to go up to 18? or there abouts, but this can be unpractical & needs slightly more than DIY skills to produce. In a lot of cases Boarders, Tormentors or house rag/olio/valances can be adjusted to cover the top masking. Depending upon your space sight lines & punters levels of balcony, ashtrays & gods . Here is a couple of sites that may help;- http://theatre.sjsu.edu/culley/TA105%20VW%20Assignments/TA 105As4VW.html http://upstagereview.org/StagecraftArticles/makingflat.pdf My self I prefer to skin the flats with unbleached calico & produce soft flats, rather than the hard TV/Studio type. But with the TV type I cover skin them with calico, which gives the best of both worlds. However I?m not sure what ?Luan? is? I would imagine it to be a local propriety brand/ generic name for something like wall paneling sheets, which are normally a stock 8? x 4? [1200 x 2400] standard sheets. Avoid using Masonite as this may cause you more problems, than you can wave a stick at, being a layered cellos material [compressed cardboard/paper particles]. As it can split away easily if nailed & can tend to warp in layers or become pregnant with water, as it is hydroscopic, unless completely sealed. Frankly I stick to calico/muslin, as it is light & the flat can easily be re-skinned or repaired, unlike hard board. When making up the frame, you can use a variety of joints. Such as the butt, Halving, Mortis & tenant or biscuit methods. The simplest is to just butt joint the wood together. relying on the corner blocks [gussets] Keystones to keep the frame square. You can use ?gang nail plates?, these can be a pain & work loose over a period of time, but are a quick fix method. However in most cases the joints need them on both sides & this can become a problem with soft flats. I find to glue all the joints & use screws in preferences to nails, where you can. I ensure no nails are used to hold or join flats together, as these are a total pain & take a lot of effort denailing on a set bump out & cause more damage than they are worth. The only time I use nails as such is as removable pin on hinges, as a last resort. If I can?t buy the removable pin hinges locally, I pick a standard hinge & grind off the one end of the pin & remove it, so the hinge is in two halves. Get a length of the same diameter steel rod & cit it to length, adding about 2" that can be circularly bent at one end, as a finger grip for easy removal. Also file or grind a chamber around the other cut end, to make it easy to insert. Each flat I produce has hinge halves on each side style. These are set up on the initial flats stock, with a template. So as each flat will marry up with each other. Also they come in handy when linking up with braces & rostra. Each hinge has a pin on a lanyard hanging down, for quick set up & they don?t loose the pins! When using a unbleached calico skin, it will shrink up tight as a drum to the frame. Use a milky solution of white PVA wood glue & water, to paint onto the outside frames surface, prior to attaching the calico, allow to dry before applying either watered down wallpaper size or paint as surface bond, in order to shrink it. Further I always use cleats & toggle sash cords. The sash cord is run thru an angled hole from the top rail to back of the flat, this pulls together the tops when joining. The cord is captivated at the hole with a figure of 8 knot or just attached in some way on the top of the rail. The cleats are offset to give a serpentine path fair lead, for the sash cord. This method is fast when tithing up flats together, no matter how tall they are. All it takes is a practiced flick of the wrist to wind the sash down through the cleats, from the top & use a hitch to pull tight. Then tie off in a half bow for easy removal later, even if it is on 20? flats. Also when striking soft flats it is a matter of just pulling undone the bow & flicking off the toggle sash, then either letting flat fall & resting gently on stage on a cushion of air or jogging it off. With a number of flats joined together it is always an idea to use a Ledger dropped in over the width, to keep the wall flat. A leger is just a long piece of wood with steel clips along it, that can be dropped over the toggle or Top rail or into corresponding female clip receptacles. Next is window & door flats. Door flats are easy enough & are framed up in the same manner, except it is probably easier to make up flats to suit a bog standard cheap domestic doors available from the hardware shop or salvage yards. use 1? jogger flats on each side & a Header flat frame on top. Use a door plate, screwed on the bottom of the side flats, across the door opening, This will act as a stretcher & keep the opening legs from wandering & help keep it square to accommodate the door/doors. This is a flat or half round piece of metal plate, normally with a twist in each end, to allow for it to be screwed onto the back at the base of the side flats. Enabling it to lay flat on the stage & even screwed down. You can join them up & skin them completely or use the flats as separate pieces. So you can adjust them by adding a wider Header for double or special sized doors. The same with windows except they generally need a Header as a Tail flat as well. On a Gaff door or window flats, the drop pin hinges come in handy to use. Rather than storing a heap of different size window or door flats. Also when needing to set up corner flats, screwed on blocks at the back of the flat, set in from the edge of the style, too the width of a flats style edge. Will make a snug fit & help locate it squarely at the corner. When knocking together the frames, if you don?t have any sash cramps or method of clamping the joints together. Grab some Hold Down load straps, that are cheap enough these days from an Auto Parts store, the type that have a realisable ratchet mechanism on them. These make efficient clamps t pull together all the glued frame joints. To ensure that it is a good joint, remembering;- It is not the amount of glue you put in, but the amount that is squeezed out, that counts! Bracing the flats use the French style brace hinged on to the Style at the rear or you can get a sophisticated adjustable stage brace, with a rams horn on the end, that hooks into an eye bolt on the back of the flat. With soft skin or covered flats, after they have been joined together, use a ?Dutchman? over the joints, before or during painting. I prefer to use roller bandage for ease, while it can be more expensive than masking tape, it gives a seamless finish & matching texture of the fabric skin on the flat. Although you can tear strips of calico & I even used newspaper at a pinch, but this tatty & messy. Bandage is uniform & easy to adhere at the top with a slap of paint & let it roll down, then just paint it on. Leaving an extra piece when trimming it off at the bottom, that tacks under the flats bottom rail, offering a grip to help with stripping it off easily in one piece, at the bump out. Hope this all helps! |
|
|
Joe
Western Gondawandaland turn right @ Perth. Hear the light & see the sound. Toi Toi Toi Chookas {{"chook [chicken] it is"} May you always play to a full house} |
|
|
IP Logged |
|
|
whitebat
Celebrity

Joined: 8/05/07 Location: United States Online Status: Offline Posts: 137 |
Posted: 8/17/07 at 12:21am |
|
Has anyone used the corrugated metal fasteners in framing with butt joints? I'd like some pros and cons of using them.
|
|
|
IP Logged |
|
|
Gaafa
Celebrity
Joined: 3/21/04 Location: Australia Online Status: Offline Posts: 1181 |
Posted: 8/17/07 at 10:00pm |
|
With wiggly nails they will work as long as you still use gussets & keystones
on jionts. They don' work too well on hard wood & across grain,
even with pine, they tend to split the wood - unless your very careful
hammering them in.
If you want something quick & easy 'Gang nail' plates work well, as used in Truss framing, but can cause a problem when applying the skin. Biscuit jionts & glueing is easy enough, if you squeeze the jionts & glue out mechanicly. The simplest & cheapest clamps are vehicle luggage/load tie down/hpld on straps, with the rotating tightener attachments. Any Auto or hardware store sell them. Much easier then sash cramps or pipe clamps & the like, http://cgi.ebay.com.au/KTM-Soft-Tie-Downs_W0QQitemZ230162442416QQihZ013QQcategoryZ32628QQtcZphotoQQssPageNameZWDVWQQrdZ1QQcmdZViewItem |
|
|
Joe
Western Gondawandaland turn right @ Perth. Hear the light & see the sound. Toi Toi Toi Chookas {{"chook [chicken] it is"} May you always play to a full house} |
|
|
IP Logged |
|
|
gracie
Walk-On

Joined: 4/04/07 Location: United States Online Status: Offline Posts: 0 |
Posted: 8/26/07 at 10:42am |
Found this that explained it best...
Proper spelling, which I didn't know until I looked it up...Luaun.
Most of the luaun I've seen or used isn't plywood, in the strictest sense. Plywood is made from multiple layers of thin sheets of wood pressed and glued together with the grain alternating direction. This gives plywood its strength.
Luaun typically has a solid core material sandwiched between two layers of veneer. I believe the veneer is some species of low grade mahogany. Luaun is typically used in interior applications, such as an underlayment for vinyl flooring. It's also used to make hollow core interior doors.
I'm not sure what the core material is. I suspect it is some kind of compressed wood fiber material. I also do not know if the glue is rated for exterior use. Very light wt. 1/4" or less. You're right Gaafa. It does come in 8'x4' sheets and is about the weight of wall paneling. Smooth on both sides, tho.
|
|
|
IP Logged |
|
| Page of 2 Next >> |
| |
||
Forum Jump |
You cannot post new topics in this forum You cannot reply to topics in this forum You cannot delete your posts in this forum You cannot edit your posts in this forum You cannot create polls in this forum You cannot vote in polls in this forum |
|